Reusable Workflow: Copy Final Documents from Draft to Final Library
Overview
Multiple teams need to work on specific contracts. Each team needs their own library to work in. Once they have a final version of the file it should be copied to a final documents library where all final contracts can be viewed.
Solution considerations
- All libraries need to be within the same site since workflows can only copy within the same site.
- Workflow is created as a reusable workflow. This was the workflow is deployed at site level and is added to each library. (don’t need to create a workflow per library).
- The Workflow was created as a 2010 workflow since we need a custom column to determine if the document will be copied. Only a reusable 2010 workflow can have associated columns (columns other than Document name, modified, modified by, created, created by).
Solution Step by Step
Create Libraries and Site Columns
- Create a draft library per team and one final library.
- Create a Site Column: Contract Status. The default value will be Draft, users will change it to Final for the final document version.
- Create another site column for Team. This will indicate which team the document came from. In each draft library, set the default value to that teams name. When the document is copied, the metadata related to the document will copy over as well.
- Add both site columns to all libraries, including the final library.
Create a 2010 reusable workflow
- Open SharePoint Designer, navigate to workflows on the left navigation
- On the ribbon select Reusable Workflow
- Enter the workflow name and change the platform type to SharePoint 2010 workflow
- Select OK
- First add the Associated Column: Contract Status. This is a site column that is in every draft library, this will determine if this document should be copied to the final library or not.
- Select Association Columns on the ribbon
- Select the option: Select Site Column
- Select the column and select OK
- Rename Step 1 to Check Status
- Add an Action: Log to history, Type in the text Workflow Started.
*This will help in troubleshooting workflow to determine if the workflow started or not. - Enter a condition: If current field equals value. Select Contract Status from drop down menu and type in the value Draft
- Beneath the condition, add the action Stop Workflow. Fill out the message to log
- Insert a new Step, rename this step to Copy Final Document
- Add Action: Copy List item
- Select to copy current item to the Final Library
- Publish Workflow
Note: If the users changing the documents to final do not have access to the final library, you will need to add an impersonation step.

For Development Environment Only: Update list and column ID
*If you are creating the workflow in the Development environment (not production), you will need to update the list and column id for the workflow to work when you deploy it
- Edit list and column ID to production ID. Every list and column has an ID, for the workflow to work when deploying production. You have to manually update the Ids and then deploy.
- Get List ID
- Navigate to the list/library settings
- In the list settings URL you will see: List=%7BEEA391B8%2DBD9C%2D4A20%2DB765%2DA6B945E6B9A4%7D
- That is your ID but it needs some clean up.
- Remove from the beginning of the ID – %7B
- Remove from the end of the ID – %7D
- Replace all %2D to –
- Final List ID: EEA391B8-BD9C-4A20-B765-A6B945E6B9A4
- Get Column ID
- Update the below URL, Add the production site and your list ID in place of Your Site and your list GUID
[YOUR SITE]_vti_bin/owssvr.dll?XMLDATA=1&List={your list GUID}&Cmd=ExportList&ExtendedFieldsProperties=1&ExcludeViews=1 - This will ask you to open an excel file, select Open. You will see some code in your browser. Search for the column name and you will find the ID. Copy the ID.

- Update the below URL, Add the production site and your list ID in place of Your Site and your list GUID
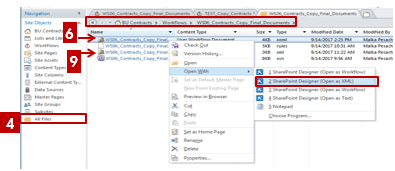
- In SharePoint Designer, on the left navigation, select All files >>Workflows
- Open the workflow you are creating. If you renamed the workflow, it will have the original name that the workflow was created with
- Right click on the xoml file (first file), select SharePoint Designer (Open as XML)
- Look for ToListID=
Update the listed Id with the production library ID - On the top left of the ribbon, select the save icon
The List ID will be updated - The next workflow file to edit is the wfconfig.xml file (3rd file)
- Right click on file, select Open With then select SharePoint Designer (Open as XML)

- Look for Field ID=
Update the field Id with the Production ID - On the top left of the ribbon, select the save icon
- Now when you go back to the workflow and edit the workflow you will see the List ID Displaying and the condition field is blank. This is good, when you deploy the workflow it will find the production items and related Ids.

- Deploy the workflow to production as usual
Add Reusable Workflow to Draft Libraries
- Navigate to the library settings then workflow settings
- Then add the new workflow by selecting: Add a workflow
- Fill in the workflow details. Select the new reusable workflow from the workflow template list
- Enter a Unique name for this workflow. Every time you add the reusable workflow to a library, it will need a unique name specific to that library.
- Tick the box for starting when item is created and changed
- Then Select OK

Now the documents marked as Final in the draft library will automatically copy to the Final Library.